

These DIY velvet Christmas ornaments add a touch of elegance to your holiday decor. Soft and luxurious, they can be customized in various colors and shapes to match your festive theme.
This project is simple and requires minimal materials, making it a fun activity for families or individuals looking to create personalized ornaments.
Elegant Velvet Ornaments for the Holidays
Transform your holiday decor with stunning velvet ornaments that bring a touch of sophistication to your Christmas tree. These ornaments are not just visually appealing; they also offer a delightful tactile experience.
Crafted from soft velvet fabric, these ornaments can be shaped into various forms, allowing for endless creativity. From stars to hearts, the possibilities are as diverse as your imagination.
Materials Needed for Your Ornaments
To create these beautiful decorations, gather a few simple materials. You will need velvet fabric in an array of colors to suit your festive theme. Cardboard or foam serves as the base for your ornament shapes.
Other essentials include scissors for cutting, a hot glue gun with glue sticks for assembly, and ribbon or twine for hanging. For those who wish to add a personal touch, consider decorative embellishments like beads, sequins, or buttons.
The Crafting Process
Begin by cutting out your desired shapes from the cardboard or foam. Common choices include classic shapes like stars, circles, and hearts, which are perfect for capturing the holiday spirit.
Next, cut pieces of velvet fabric large enough to cover each shape, ensuring you leave some extra fabric around the edges for a clean finish. This step is crucial for achieving a polished look.
Assembling Your Ornaments
Apply hot glue to the ornament shape and carefully press the velvet fabric onto it. Smooth out any wrinkles for a flawless appearance. Fold the edges over and glue them down to secure the fabric in place.
To hang your creations, cut a piece of ribbon or twine and glue it to the top of the ornament. This simple addition makes it easy to display your beautiful handiwork on the tree.
Adding Decorative Touches
For those who want to elevate their ornaments even further, embellishments are a fantastic option. Consider adding beads, sequins, or buttons to enhance the visual appeal of your ornaments.
These decorative elements can be glued onto the velvet surface, allowing you to personalize each ornament to reflect your unique style and holiday spirit.
Final Touches and Display
Once your ornaments are assembled and embellished, allow the glue to dry completely. This ensures that everything stays securely in place when you hang them on your tree.
When the time comes to decorate, you’ll have a stunning collection of velvet ornaments that not only look elegant but also carry the warmth of handmade craftsmanship. Enjoy the festive atmosphere they create in your home!
Elegant Velvet Ornaments for the Holidays
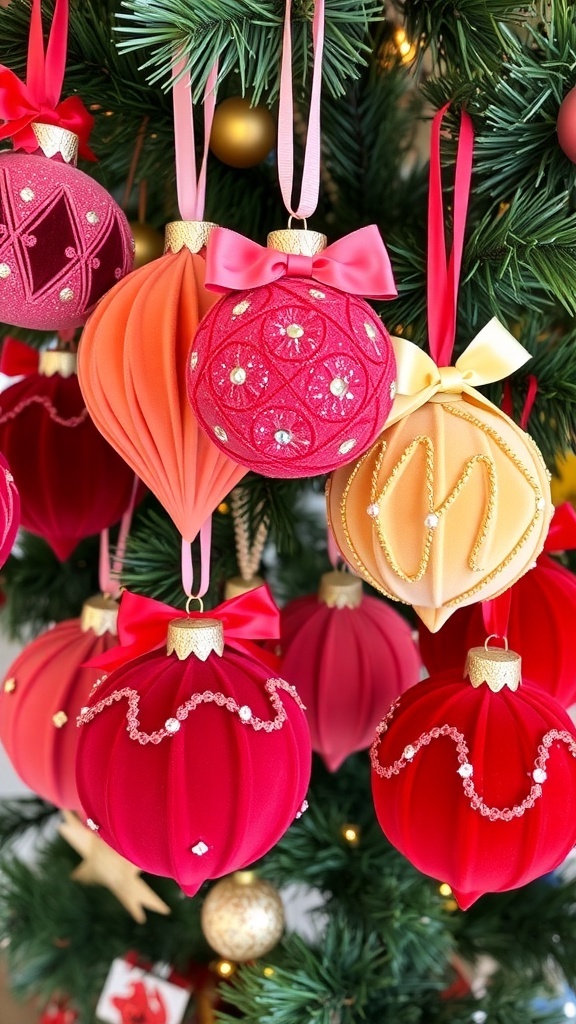
These velvet ornaments are made by covering a base shape with soft fabric, creating a beautiful and tactile decoration for your Christmas tree. The process takes about 1-2 hours, depending on the complexity of the designs, and can yield multiple ornaments.
Ingredients
- Velvet fabric in various colors
- Cardboard or foam for ornament shapes
- Scissors
- Hot glue gun and glue sticks
- Ribbon or twine for hanging
- Decorative embellishments (optional) such as beads, sequins, or buttons
Instructions
- Cut Shapes: Cut out your desired ornament shapes from cardboard or foam. Common shapes include stars, circles, and hearts.
- Cut Velvet: Cut pieces of velvet fabric large enough to cover each ornament shape, leaving extra fabric around the edges.
- Glue Fabric: Apply hot glue to the ornament shape and carefully press the velvet fabric onto it, smoothing out any wrinkles. Fold the edges over and glue them down to secure the fabric.
- Add Hanging Loop: Cut a piece of ribbon or twine, and glue it to the top of the ornament for hanging.
- Embellish: If desired, add decorative embellishments like beads or sequins to enhance the ornament’s appearance.
- Let Dry: Allow the glue to dry completely before hanging your ornaments on the tree.
Cook and Prep Times
- Prep Time: 30 minutes
- Craft Time: 1 hour
- Total Time: 1.5 hours
- Servings: N/A
- Calories: N/A
- Fat: N/A
- Protein: N/A
- Carbohydrates: N/A