

Creating vintage-inspired Christmas ornaments is a delightful way to add a personal touch to your holiday decorations. This DIY project allows you to craft unique ornaments that reflect your style and nostalgia for classic designs.
Using simple materials and techniques, you can create beautiful ornaments that will be cherished for years to come. Whether you’re making them for your own tree or as gifts, these vintage ornaments will bring a festive spirit to your home.
Creating a Festive Atmosphere
Transforming your home into a winter wonderland can be achieved with vintage Christmas ornaments that evoke nostalgia and charm.
These ornaments, with their intricate lace designs and vibrant colors, bring warmth to any space.
Arranging them on a wooden table or hanging them from a rustic branch creates a cozy setting that invites holiday cheer.
Materials for Vintage Ornaments
To craft these delightful decorations, gather a few simple materials.
Clear glass or plastic ornaments serve as the perfect canvas for your creativity.
Acrylic paints in various colors will allow you to personalize each piece, while lace or vintage fabric scraps add a touch of elegance.
Don’t forget the glitter or sequins for that extra sparkle!
A hot glue gun will help secure your embellishments, and ribbons or twine will make hanging them a breeze.
With just a few supplies, you can create a stunning collection of ornaments.
Crafting Process
Begin by preparing your ornaments.
If using glass, carefully remove the tops and clean the surfaces to ensure the paint adheres well.
Next, apply acrylic paint in your chosen colors, allowing them to dry completely before moving on.
Once the base is ready, it’s time to add those vintage touches.
Cut the lace or fabric into strips and attach them with hot glue.
Sprinkle glitter or add sequins for a dazzling finish, making each ornament unique.
Reassembly and Display
After the decorations have dried, reattach the tops of the ornaments.
Cut lengths of ribbon or twine and tie them through the tops for easy hanging.
Now, your vintage ornaments are ready to be displayed!
Whether you hang them on a tree or arrange them in a decorative bowl, these ornaments will enhance your holiday decor.
Creating Lasting Memories
Crafting vintage Christmas ornaments is not just about decoration; it’s about creating memories.
Gather friends or family for a fun DIY session, sharing stories and laughter as you work together.
These ornaments will not only beautify your home but also serve as cherished keepsakes for years to come.
Embracing the Holiday Spirit
As the holiday season approaches, let your creativity shine through with these vintage-inspired ornaments.
The combination of colors, textures, and sparkling details will surely bring joy to your celebrations.
Embrace the spirit of the season by adding a personal touch to your decorations, making your home a warm and inviting space for all.
Craft Your Own Vintage Christmas Ornaments
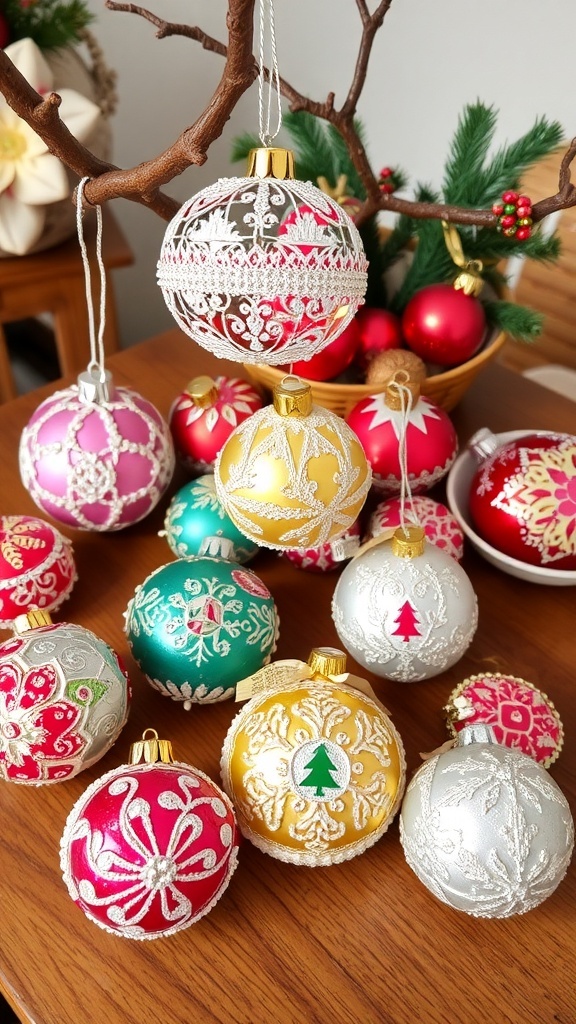
These DIY vintage Christmas ornaments can be made using materials like glass balls, lace, and paint. The project is suitable for all skill levels and can be completed in a few hours, making it a perfect holiday activity for families or friends.
Ingredients
- Clear glass or plastic ornaments
- Acrylic paint in various colors
- Lace or vintage fabric scraps
- Glitter or sequins
- Hot glue gun and glue sticks
- Ribbons or twine for hanging
- Paintbrushes
- Scissors
Instructions
- Prepare the Ornaments: Start by removing the tops of the glass ornaments if using. Clean the surface to ensure paint adheres well.
- Paint the Base: Use acrylic paint to cover the outside of the ornaments in your desired colors. Allow them to dry completely.
- Add Vintage Touches: Cut lace or fabric into strips and use hot glue to attach them to the ornaments. You can also sprinkle glitter or add sequins for extra sparkle.
- Reattach Tops: Once the decorations are dry, carefully reattach the tops of the ornaments.
- Add Hanging Ribbons: Cut lengths of ribbon or twine, and tie them through the tops of the ornaments for hanging.
- Display: Hang your vintage ornaments on the Christmas tree or use them as part of your holiday decor.
Cook and Prep Times
- Prep Time: 15 minutes
- Craft Time: 2 hours
- Total Time: 2 hours 15 minutes
- Servings: Varies based on the number of ornaments made